
Admin → Locations & Registers uses the Building 2 icon. A new location is created immediately with a default Register 1. Location fields are drafts until the page-level Save; most register selectors/checkboxes auto-save the entire current register settings object, register names save on blur, restriction and user assignments write separately, and NMI Gateway has its own Save. Deletion is permanent and can affect sessions, devices, inventory, reporting, and transaction access. Make one narrow change at a time and verify in the actual location/register.
Before you beginUse an authorized administrator account and confirm the business shown in the top bar. Record the previous value before changing a live operational setting.
Step by step
- Go to Admin → Locations & Registers, identified by the Building 2 icon. Review every card’s internal name, address, Active/Inactive state, and register count before creating or deactivating anything.
- Choose Add location only for an approved operating scope. Enter the required Name and optional Address, then choose Add location once. CentriPOS immediately inserts the location, attempts to create Register 1, and opens the new location editor. Confirm both records; a location can exist even if the default-register insert fails because those writes are separate.
- Understand location identity. Location name is internal. Public display name appears on supported e-carts, receipts, and delivery tickets and falls back to the internal name when blank. Set the timezone to the location’s operating timezone, not the administrator’s current timezone.
- Enter a complete Street address. It can participate in tax synchronization, delivery-hub/closest-store distance pricing, route planning, customer documents, and map links. A syntactically saved address is not proof it geocodes correctly; test the dependent workflows.
- Set the location Email and Phone only to approved public/operational contacts. Phone formatting follows the tenant country context. Review customer-facing receipts, e-carts, fulfillment slips, and notifications after changing identity fields.
- Under Tax settings, choose No location default or an approved tax rate. Registers can inherit this value or override it. Tax selection is configuration only; test taxable, exempt, online, in-store, return, delivery, and shipping carts before normal use.
- Under Numbering, set the receipt prefix and Starting number. Save normalizes a blank prefix to S and starting number to at least 1. Next number is read-only and never moves backward: Save keeps the greater of the existing next number and the starting number. Do not use this form to reset or reuse issued receipt numbers.
- Set PO number prefix and PO starting number only under an approved purchasing convention. This page does not preview collisions or historical numbering effects; create a controlled purchase order after saving.
- Choose the location-level Sell screen prompts as needed: warn about negative inventory, missing customer, or missing note. These are warnings, not hard inventory, customer, or note requirements. Verify each prompt on Sell with the affected location selected.
- Choose the page-level Save and wait for Location saved. Cancel/Back does not call Save for draft location fields. Reopen the location and verify public name, timezone, address, contacts, tax, numbering, and prompts.
- In Registers, choose + Add register to immediately create Register <count + 1>. Rename it in the row and leave the name field to save. Duplicate names or gaps in numbering are not prevented by this naming convention; use stable operational names.
- Expand each register. Under Receipts, assign a custom or POS Default receipt template. The location owns the protected prefix/number sequence shared by its registers; the older per-register receipt number fields are retained internally but not editable in this panel. Run an actual print/email/public-link test after assignment.
- Under End of sale, choose whether to Select user for next sale, Email receipt, Print receipt, ask for a note on all sales/never/returns only, Print note on receipt, and Show discounts on receipts. Most changes trigger a register save; wait for Register saved and reopen before changing several unrelated settings.
- Under Tax, select Use location default or a register-specific approved rate. This update saves immediately through the register editor. Confirm the displayed and calculated tax on a controlled sale and return from this exact register.
- Under Cash management, choose Cash, No cash, or Cash and card. This value affects operational expectations but does not by itself pair a payment terminal, open a session, or remove a configured payment type. Test open/close, float, cash payment, payout/drop, card, and closure reporting as applicable.
- Under Customer Signature & Terms, enable Require customer signature before payment only when the business has approved the legal/operational flow. Choose On-screen or Topaz USB, then Full T&C text, Simple acceptance line, or Signature only. Review customer readability, consent, retention, and receipt evidence.
- The remembered signature choice is local to This device for the tenant/register. Reset this device clears that device preference only. For Full T&C, edit the rich text and choose Save Terms; for Simple acceptance, leaving the label field saves through the register update. Test the actual hardware/browser.
- Under Access Restriction, switching Restricted register writes immediately and separately. When enabled, only owners, super admins, and assigned users can view that register’s sales and invoices. An empty assignment list leaves only owners/super admins. Assign or remove users deliberately and test with a non-owner account.
- The assigned-user picker can show inactive users with an Inactive badge. Do not grant access based only on the name; confirm employment/access status. User assignment is a separate write and is not reverted by Cancel on the location page.
- Under NMI Gateway, leave the register inheriting storefront settings unless an approved merchant/register requires an override. A tokenization key is customer-side; the Security Key is private and stored encrypted for server-side processing. Never include either credential in screenshots, tickets, or public documentation.
- For an override, configure ACH and 3DS only when the gateway account supports them. The optional PaymentsHub Reporting Add-On can use a register reporting MID, Production/Beta/Sandbox environment, developer key, private auth password, app source, and fee-collection mode. Choose the NMI Gateway Save and wait for its success message; it is independent of register auto-save and the page-level location Save.
- Under Terminal devices, pair supported CentriPay terminals to this location and choose their default register routing. A paired terminal is not the same as an NMI online-gateway override. Run a controlled push-to-terminal transaction and inspect CentriPay Transactions before retrying any uncertain result.
- Use the location card Active switch for reversible operational retirement. It writes immediately. Before deactivating, inspect open register sessions, fulfillment schedules/routes, device pairings, inventory ownership, active users, public/online availability, tax mappings, and reports; then verify users can no longer select it where intended.
- The list shows Trash only after a location is inactive. Its confirmation says registers, register summaries/sessions, cash records, terminal pairings, and location inventory will be permanently removed while receipts retain the location name. The handler deletes registers first, then the location; confirm backups/retention and downstream database behavior before Delete permanently.
- The editor’s Delete location uses a separate browser confirmation and directly deletes the location record. Do not treat the two deletion paths as interchangeable or tested cleanup tools. Prefer deactivation unless permanent erasure has been explicitly reviewed; there is no restore button.
- Deleting a register uses a browser confirmation and permanently deletes that register. Check sessions, receipts, assignments, terminal routing, gateway overrides, reports, and required audit retention first. A deleted register is not automatically recreated.
- After any change, sign in with an appropriate test user, choose the exact business/location/register from the CentriPOS context selector, and verify Sell, register session, receipt numbering/template, tax, customer prompts, signature, cash/card behavior, fulfillment, inventory, terminal routing, restricted reporting, and CentriPay activity.
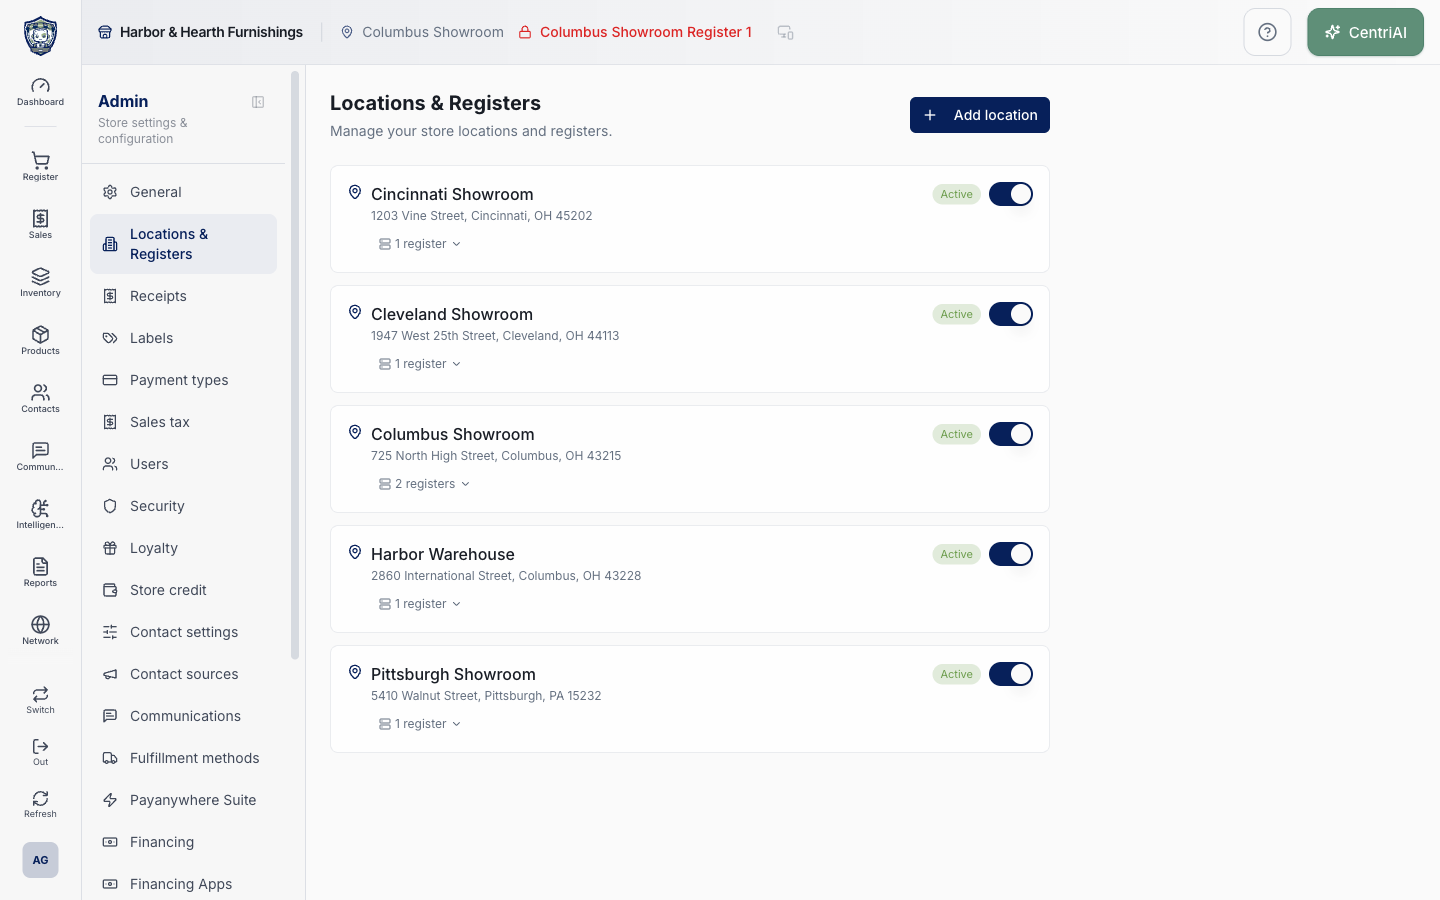
- Harbor & Hearth’s real Amelia Grant screenshot shows the loaded Locations & Registers list at 1440×900 with only business showroom/warehouse cards visible. No register details, credentials, assignments, customer data, edit forms, or dialogs were opened and no values were changed.
Screen and contract reference
| Control or area | What it means |
|---|---|
| Building 2 icon | Exact Admin navigation icon for Locations & Registers. |
| Add location | Immediately creates the location and then separately attempts to create Register 1. |
| Location name | Internal operational name. |
| Public display name | Customer-facing name on supported e-carts, receipts, and delivery tickets; falls back to location name. |
| Timezone | Location operating timezone used by time-sensitive workflows. |
| Street address | Used by supported tax, fulfillment pricing, routing, map, and customer-document workflows. |
| Default sales tax | Location tax fallback; registers can inherit or override. |
| Receipt prefix | Location-wide prefix; blank normalizes to S on Save. |
| Starting number | Minimum initial sequence value; normalized to at least 1. |
| Next number | Read-only protected counter that Save will not move backward. |
| PO numbering | Location purchasing prefix and starting-number settings. |
| Sell prompts | Warnings for negative inventory, missing customer, and missing note; not hard enforcement. |
| Page Save | Persists location fields/settings and logs location_updated. |
| + Add register | Immediately inserts a register named from the current count. |
| Register name | Saves when the inline field loses focus. |
| Receipt template | Register assignment to a custom or POS Default template. |
| End-of-sale settings | User selection, email/print receipt, note prompt, note printing, and discount display. |
| Register tax | Inherit location default or use a register-specific rate. |
| Cash management | Cash, No cash, or Cash and card operational mode. |
| Require signature | Pre-payment signature workflow for this register. |
| Signature input | On-screen or Topaz USB. |
| Terms display | Full scrollable text, simple acceptance line, or signature only. |
| Reset this device | Clears the locally remembered signature choice for this tenant/register. |
| Restricted register | Immediate visibility restriction to owners, super admins, and assigned users. |
| Assigned users | Separate access records; may include users visibly marked Inactive. |
| NMI Gateway override | Register-specific online gateway/ACH/3DS configuration with its own Save. |
| PaymentsHub Reporting Add-On | Optional register reporting credentials, environment, and fee-collection metadata. |
| Terminal devices | Location CentriPay terminal pairing and default-register routing. |
| Active switch | Immediate location activation/deactivation. |
| List deletion | Available only while inactive; deletes registers then location after a detailed confirmation. |
| Editor deletion | Separate direct location delete after native browser confirmation. |
| Register delete | Permanent register deletion after native browser confirmation. |
| Harbor & Hearth screenshot | Real Amelia Grant /admin/locations capture showing only loaded location cards; no register or secret details exposed. |
Expected result
The location and its registers appear with the intended status and become available only to users and workflows that have access.
Troubleshooting
- Confirm you are changing the intended business and location before saving.
- Record the previous setting when a change affects live selling, payments, tax, or integrations.
- Use a controlled test record after saving before rolling the setting out broadly.
CentriPOS API explorer · API Center administration
More guides
Build an itemized payment in MoneyUse Products or Amount & description to build one receipt, attach the customer, and follow the appropriate payment or service-estimate workflow.
Take a one-time payment in Virtual TerminalReview a one-time amount, tax and contact at the correct payment station, use its verified secure checkout, and recover the original receipt after an uncertain result.
Review booking payments, refunds and earned careKeep a booking’s customer payments, unused advances, completed care, cancellation fees and refunds distinct, then read a correctly scoped accrual report.
Configure booking properties and customer pagesSet accommodations, service packages, availability, required intake and payment terms, then review the correctly branded booking page before sharing it.